Virginia
Here is a wonderful email that Mane Imports received from one of our clients. Mane Imports sold a consignment Hermes saddle to Virginia in New Mexico.
I just wanted to thank you for everything – the saddle arrived today, and it exceeded my wildest expectations. It was the icing on the cake to an exceptional transaction on every level. I’d look for an opportunity to do business with maneimports again…and of course, I’m very much looking forward to meeting you one of these days! Regards, Virginia
Congratulations Jill and Dennis!
From : Jill and Dennis
Jasmin helped Jill Richard’s and her partner Dennis find their horse, Rosencharmeur a Rotspon x Ornella gelding, at the Verden Auction. Jill and Dennis bought this wonderful gelding unseen! Jill was on the phone with Jasmin while the auction was taking place. Rozy’s new owners just love him!
Development of the half pirouette out of the medium walk and the half pirouette out of the full halt
1. Precondition for the development of the half pirouette
The half pirouette out of the medium walk and the half pirouette out of the full halt is a lesson that helps to develop the collection of your horse and achieve throughness.
The half pirouette out of the walk is ridden out of the medium walk. The half pirouette out of the full halt is ridden out of a correct full halt.
The walk is a pacing movement in four beats and eight phases without momentum, meaning: the horse does not have a moment with all four legs in the air. The eight phases are:
• Three leg support
• Diagonale two leg support
• Three leg support
• Laterale two leg support
• Three leg support
• Diagonale two leg support
• Three leg support
• Laterale two leg support
a. Precondition of your horse
The horse has to be in a secure contact and sensitive to the rider’s aids. He needs to know the beginning of the lateral aids. Moreover he must be able to walk in a clear four beat in secure contact and correct bending.
b. Precondition of the rider
The rider has to have a secure balanced seat and has to know the necessary aids fort he half pirouette.
2. Aids for the half pirouette
Both forms of half pirouettes will be started with several half halts to make your horse attentive. Regarding the half halts refer to our April article. The half halts are especially important while starting the half pirouette out of the medium walk in order to get a small circle of the hind legs and a correct lesson.
The aids of both forms of the half pirouette do not have differences and are the following:
• Put your weight on your inner seat bone,
• the horse’s neck is bent into the direction of the movement,
• your inner leg is giving an forward impulse in the position at the saddle girth,
• your outside leg is in the position a hand behind the girth controlling the horse’s outside hind leg. This is not an lateral aid, it is only controlling the outside leg. With an lateral aid the horse would make a lateral step with the outside hind leg thus crossing the hind legs which is incorrect,
• the inner rein can have a slightly lateral aid to start the turn,
• the outside rein controls the bending but is elastic enough to let the horse move toward the turn. Do not press your horse into the lateral movement with the outside rein.
The horse is not allowed to walk back, the rider has to have the horse in front of his leg moving forward. The turning point has to be around the horse’s inner hind leg, which moves in the rhythm of the walk. After the turn the horse stands a bit besides the lead and will be led back to the lead with one or two forward-sideward steps. All this will be done in a constant movement and flow with a correct bending to the movement direction. The half pirouette out of the walk ends with the correct walk of the horse on the other lead. The half pirouette out of the full halt ends with a correct full halt.
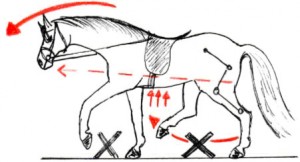
aids for the half pirouette to the left
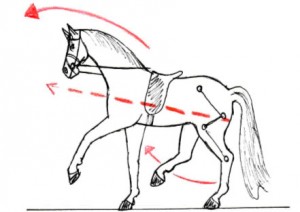
aids for half pirouette to the right
symbols :
3. Exercises for the development of the half pirouettes
The rider starts the development of the half pirouette with riding walk with a correct bending of the horse. Therefore, it is usual to start the half pirouette out of the walk and later add the half pirouette out of the full halt.
Start riding on a circle with a correct four-beat walk and a correct bending of the horse. Then start making the circle smaller in a shoulder fore with a lateral leading inner rein. The outside rein and the outside rider’s leg prevent the horse from falling over his shoulder. Regarding the shoulder fore and the shoulder in refer to our previous article.
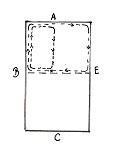
In a second exercise, ride on a half arena (A-F-B-X-E-K-A on the left lead for example). The corners of this square will be ridden around the inner rider’s leg. The horse’s forehand turns around the horse’s hind legs. Do not forget to make sure the four beat rhythm of the walk stays correctly. The hind legs move in the rhythm of the walk. Prior to this “half-half pirouettes” you have to ride on your horse’s crooked side in the position 2, on the other side in shoulder fore.
Again (refer to our previous articles regarding riding in position 1 and 2) Shoulder fore („Position 1“): The horse steps with his inner hind leg in the direction between his front legs, with the outside leg into the lead of the outside front leg. From the front you will see the inner hind leg between the front legs. Thus the horse has a slight bending in the rib cage.
The aids for Position 1 are:
– weight on the inner seat bone,
– inner leg has a forward aid at the girth,
– outside leg controls the outside horse’s hind leg a hand behind the girth,
– inside rein gives the horse’s neck an inside position,
– outside rein controls this position.
Riding in position („Position 2“): The horse moves with the inner leg pair on the lead. The outside hind leg moves between the front legs. Looking from the front you see the outside hind hoof appear between the horse’s front legs. The horse’s ribcage is slightly bend.
The aids are not much different from position 1. The inside rider’s leg has to keep the horse’s inside hind leg active, the outside leg positions the horse’s outside hind leg between the front legs.
In the further development the circle of inner hind leg gets smaller. Nevertheless, it is important to control the correct four-beat rhythm of the walk. Later on you can develop the full pirouette out of the half pirouette where the hind legs move in a full small circle without crossing.
Do not forget to put a lot of variation into your horse’s training, keeping him attentive and let him enjoy his development. Do not overstrain it and take your time to develop this lesson. Taking your time with this lesson will safe time in the further development of lateral movements because with this exercises your horse will start to understand the nature of lateral aids and this is a first beginning for the next steps: half passes and later on pirouettes in the canter. Do not forget to tell him that he did wonderful when he makes progress and do not neglect the cool down phase. And over all:
Enjoy riding!
Adriane
ShareDevelopment of the Counter Canter
1. Precondition for the development of the counter canter
In a first step, we have to ask which preconditions have to be fulfilled to start developing the counter canter, in other words: when is your horse ready to learn the counter canter?
The canter is a swinging movement with three beats and six phases of move-ment including a moment of suspension. The six phases of movement are:
• One leg support
• Three leg support
• Diagonal two leg support
• Three leg support
• One leg support
• Moment of suspension
In the true canter the inner leg pair steps more forward then the outside leg pair.
In the counter canter the leg pair toward the arena wall steps more forward and the horse is bent slightly towards the arena wall, thus making the arena wall the inside (remember: inside is always where your horse is bent toward – looking at). Both leg pairs stay on the lead and the corners of the arena can be slightly rounded.
The counter canter is a collecting movement and it helps straightening your horse. Apart from that, a further benefit of the counter canter is that it makes your horse sensitive to the diagonal aid of the rider and makes him accept the canter aids both in the true canter and the counter canter. Many riders tend to put their horse in canter with the rider’s outside leg – a mistake that will come back to you when training the counter canter. Your horse will first not under-stand what you want from him when you give the – correct – aid for the counter canter because it is too similar with the formerly wrong given aid for the true canter. Thus the counter canter helps you to climb the last two steps of the German training scale: Straightness and Collection and makes you come to the overall goal of throughness.
a. Precondition for the horse
Precondition for the horse is that the horse has achieved the first levels of collection – otherwise it will not be able to make it through the corner in the counter canter. It has to be securely on your aids in the true canter and be able to show a couple of collected strides in the true canter. Overstraining the horse in the development can lead to uncertainty. The horse starts to get hot or changes the canter into a cross-canter – in the end loosing the contact to its rider completely. This is not the way we want to train our horses – we want the both parties – horse and rider – enjoy their develop-ment through the levels.
b. Precondition for the rider
Precondition for the rider is a good and balanced seat. You must be able to sit with a calm upper body and an elastic hip into the movement of your horse. Remember to pull your inner hip slightly more forward (Do you remember which is the inner side in the counter canter?) without pulling your outside shoulder back. Your shoulder is always aligned to your horse’s shoulder.
2. Aids for the counter canter
As every new movement, the counter canter has to be prepared with half halts to get your horse’s attention and make him step with his hindleg toward the centre point. This movement toward the centre point is necessary to make the horse take more weight on the hindleg thus making the start of the canter easier.
Let’s go through the half halts again: The half halt is a combination of all three aids of the rider: leg, weight, rein. The rider combines the weight aid on both sides, the forward leg aid with a keeping elastic rein weight thus “framing the horse” for a moment. A good ridden horse will step into the rein and seek the contact after receiving the forward aids of leg and weight this way “picking up” his rein aid by itself. Remember this: it is NOT kicking your horse in the belly and pulling the rein at the same moment! It is pushing the horse into the steady rein, frame him and then release the rein without ever losing the con-tact with your horse’s mouth. The half halt is ALWAYS finished with a releasing rein aid.
Half halts are the combination of all three aids the rider has and enable the rider to control the horse’s movement.
Important: The half halt is framing your horse with weight-, leg- and rein aid followed by a releasing rein aid.
For the true canter you will give the following aids:
– Half halts make your horse attentive and step more toward his centre point
– Your weight lies on the inner hip
– Your inner leg is pushing forward at your saddle girth
– The inner rein is giving the horse’s head an inward position
– The outside rein controls this inward position and prevents your horse to fall over his outside shoulder
– Your outside leg is controlling the horse’s outside leg giving him a movement toward centre point. Your outside leg is very important, because the horse’s outside hind leg can only bear the horse’s weight in the “one leg support phase” if properly moving toward the centre point. If not your horse will stop cantering and fall into trot.
– When you feel your horse starts to canter your inner rein releases a bit in order to give your horse the freedom to jump into the releasing inner rein without ever losing the contact to your horse’s mouth.
The weight and leg aids control the movement in the canter. The correct posi-tion of both rider’s legs is responsible fort he right lead. Every stride is ridden like starting the new canter. The rider’s calm hand seek constant contact to the horse’s mouth. With half halts the rider controls the horse’s hindlegs and makes it push toward ist centre point.
If we now connect all the dots we can see: in the counter canter the leg pair toward the arena wall is the one that pushes more forward meaning: the leg pair on the side of the arena wall is the inside lead. The aids for the counter canter are identical as for the true canter considering that the arena wall is ac-tually your inner lead.
Be aware that your inner rein has to be very sensitive in order to allow the horse’s hindleg to move toward the centre point. In Germany we call this: “The rider’s inside hand has to let the stride free”.
3. Exercises for the development of the counter canter
Precondition is –as mentioned above already – that your horse is able to show a balanced true canter with all the movements of the level A. This includes ex-act riding of the corner. Moreover the horse has to be able to show a few strides of collected true canter. Check this with the following exercise:
You ride collected true canter in a half arena (20×20 m) with exactly ridden corners (A-B-E-A). In a second step you ride collected true canter in a quarter arena (A-B-X-A) thus controlling if the horse is really able to canter through the corners immediately followed be a straight line. Remember to really ask for deep ridden corners. Change the lead with a canter-walk-canter transition. Train on the other lead.
After this check you start cantering in the whole arena in a collected true can-ter. Along the long side of the arena you start to ride a simple sinous line that has its turning point on B or E. Thus the horse canters in a counter canter on the second half of your serpentine. If the horse is comfortable with this exer-cise you start riding the bow of this serpentine bigger and bigger, this way reaching X as turning point, later reaching the opposite wall (B or E) as the turning point.
In the next exercise the degree difficulty is increases. You start cantering true canter and change the lead by using the short diagonal from for example K to B or F to E without changing the canter. It is important to stop the counter can-ter before coming to the corner of the short side, after a while you include the first corner than the second corner into this exercise. Change into the true can-ter with riding over the long diagonal (K-X-M or F-X-H) making the strides longer. Remember: you are riding “true canter on the wrong lead“, do not change your position, your correct seat is very important in this moment. Your inside rein keeps the inside position of your horse’s neck, your inner leg de-mands every stride and your outside rein prevents that your horse falls over his outside shoulder and your outside leg controls the horse’s outside hind leg. Very important: if your horse does a flying change in this moment, never pun-ish him for that! You will need the flying change later in his development and if he learns that he gets punished for the flying change he will stop offering this movement. If your horse does a flying change you have to go back in the ex-ercise starting with the serpentine again.
More exercises are the half circle out of the corner and changing the circle without changing the canter and riding a circle in the counter canter with two 10 m circles in true canter.
During all exercises it is important to ride true canter with extensions in the true canter down the long side of the wall and work the trot as well to get your horse’s attention.
The last exercise should be the starting of the counter canter – first without riding trough the corner than including the corners into your work.
Enjoy riding! Adriane
ShareIntegrating cavaletti work into your dressage horse’s daily work Part II
 Introduction
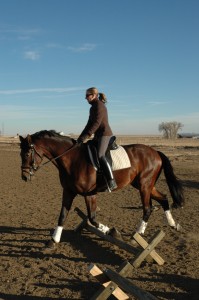
After having trained your horse on straight lines (see our article of January, Cavaletti Work Part I) it is now time to show your horse the benefits of training with cavaletti on circle lines.
Why cavaletti work on circle lines?
As already discussed in Part I, cavaletti work is a wonderful way to help your horse to build muscles and to find balance. Cavaletti work gives your horses the opportunity to activate his hind leg and helps him to relax his neck and back by arching the back upwards and bending his neck seeking the bit in a forward-downward manner. But it is a challenge for the horse to find his balance while working with cavaletti and this challenge will increase by adding the bending of the longitudinal axis, the way we ask him to do on a circle line.
Cavaletti work on circle lines will enable your horse to
- to activate his hindleg
- to build up muscle in the correct way
- find balance
- improve your horse’s ability to bend on the longitudinal axis. This will improve his balance and will be a good preparation for the coming exercises like pirouettes, half passes and every movement of the advanced dressage that requires a good bending of the longitudinal axis.
Working your horse with cavaletti on the circle lines is as much fun as working him on the straight lines and it brings your horse the much needed variety in his daily work. The increasing physical strength will give your horse the ability to concentrate better and work with you the way he wants to giving his best to please you.
Let’s get started on the circle line!
Are you curious enough by now? So let’s start with our lesson! Working on a circle line is a bit more difficult for the horse because he has to balance himself on a circle. So be sure to have practised cavaletti work on the straight line with rider or on a circle line without rider to get your horse acquainted with this kind of work before starting cavaletti work with rider on a circle line.
Do not forget:
Security advices
- Start your cavaletti work with a thorough warm up. Both horse and rider should be working for about 20 min before starting cavaletti work.
- Be sure to protect your horse’s legs with bandages, sport boots, and bell boots.
- Shorten your stirrups two or three holes.
- Stabilise the poles you are using. The poles should never lie on the ground without some sort of block securing them. If your horse steps accidentally on them he can hurt its fetlock badly. You can use the fabricated cavaletti blocks or even a short plank mounted under the poles will prevent that they roll.
- Do not use cavaletti of the type with a little cross while lungeing. The lunge can get caught in the cross and tear the cavaletti behind the horse thus causing your horse a lot of stress.
- Be sure to have the correct distances for your horse’s stride. When working in a group be sure to have a helper on the ground who adjusts the cavaletti for each horse.
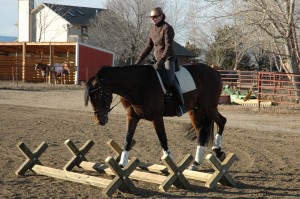 Today we will start or circle line training with a bit of medium walk over cavaletti. It is better to start again with one or two poles adding a third and fourth if your horse is comfortable, even if you have already worked with cavaletti. We can add the third and fourth pole very quickly but it is better to proceed in small steps before causing a lot of stress for the horse. Remember again: you and your horse should have fun while working together. Do not try to put too much into today’s work. Tackle the cavalleti work on the circle line again in two or three days and you will see how much your horse has learned in a short period of time
The poles are put onto the circle line into a row with a distance of 80 cm (2.6 feet) up to 100 cm (3.3 feet) in between. The big advantage of working with cavaletti on the circle line is that you can put the poles in a way that enables you to give them a distance of 80 cm on the inner side of the circle and up to 100 cm on the outside of the circle. Riding over the cavaletti on the inner side of the circle will shorten the stride of the horse while riding on the outside will lengthen the stride. This way you can add variety with one position of the cavaletti without having to change the distance from the ground. It makes working in a group a bit easier as well, because you can ask your riders to ride over the cavaletti depending on the stride of their horses without having to change the position of the cavaletti for each horse. Start with long reins and let your horse look at the cavaletti . Then ride over the cavalleti every second round. Ride on a steady circle line before, over, and after the cavaletti while controlling you horse’s hindleg with the outside leg and keeping contact with both reins. Try to build up a steady rhythm before riding over the cavaletti and preserve this rhythm over and after the cavaletti. It helps many riders to count the rhythm over the cavaletti and to keep counting after them. You can add work in trot or canter on your rounds you are not riding over the cavaletti. Then half halt your horse back to the walk, stabilise the rhythm and the circle line, and let your horse walk over the cavaletti. Then trot or canter again but come back to the cavaletti in walk. It will be amazing to see what happens with your horse after a few rounds of this exercise. Your horse will start to relax and seek the bit.
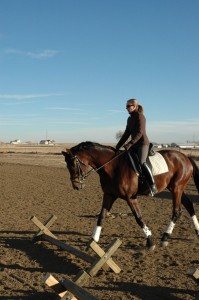 If your horse is comfortable with the cavaletti work in walk we can start to work in trot. Remember: always start with one or two poles at a time. Just because your horse does the cavaletti work in the walk, does not mean that he can muster up the balance and concentration to do four cavaletti in trot from the beginning.
The distance for the placement of the cavalletti in the trot is 1.20 (3.9 feet) to 1.40 m (4.5 feet) depending on your horse’s stride and your goals. On the circle line you can put the poles on a distance of 1.20 m on the inner side and 1.40 m on the outside of the circle. If we want to strengthen the rhythm a distance of 1.20 m will be ok. While starting your work in trot chose the distance that your horse is comfortable with and try to shorten or lengthen the strides by trotting over the cavaletti on the inner or the outside of the circle. The procedure is the same as in walk: you trot every second round over the cavaletti, build up a clear circle line and a steady rhythm before, over and after the cavaletti. You can ad canter or walk work on your “cavaletti-free” rounds, then half halt to trot and trot over the cavaletti again. Integrate your cavaletti work into your dressage work, offering your horse every now and then one round over the cavaletti and then returning to your work you were doing before.
If you think that you horse still has the strength to do the cavalletti in canter, put the poles in a distance of 3 to 3.5 m. Start with one cavaletti and find a rhythm in the canter before cantering over the cavaletti. Do not change this rhythm when starting your work over the cavaletti. Be aware that many horse jump the first time they try to do cavaletti work in canter. Try to keep a seat over the cavaletti, keeping steady contact with the reins. After a while, you can add more cavalettis and thus work on a steady rhythm.
Upcoming problems
A very common problem doing this kind of work is that your horse gets excited and tries to overachieve. In this case, diminish the challenge by taking out one or two poles thus, coming back to basic work until your horse is able to relax again.
While working your horse in canter be sure not to add a second or third pole before your horse is totally comfortable. He shouldn’t make big jumps over the cavaletti but activate his hind leg thoroughly. Keep you seat over the cavaletti and a steady contact with both reins.
While trying to heighten the cavaletti try first to heighten one cavaletti in the row, for example the last one. If he keeps his rhythm you can heighten a second one, for example the second one. Be sure to offer him a row of poles in the right distance thus showing him that nothing has changed except one height of one cavaletti. This will prevent him from jumping over the cavaletti and losing his rhythm.
General recommendation
Work on both leads. Do not bore or tire your horse with working too long over the same distances. Remember that cavaletti work is very strenuous for your horse. The cavaletti work itself shouldn’t exceed 30 min. Finish your training when your horse does the best. Do not forget to let your horse relax after this work by walking with him for a while and to tell him that he did great.
Enjoy riding!
ShareIntegrating cavaletti work into your dressage horse’s daily work Part I
Introduction
While being very popular in Germany and Europe, many other horse riding countries do not use cavaletti work on a regular basis. Cavaletti is the Italian expression that describes using poles put in a row, within a certain distance to help train the horse within its three gaits-walk, trot, canter. You can school your horse using cavaletti on straight or circle lines with rider or while lungeing. Starting the horse on the lunge is a very common way to begin cavaletti work. This way the horse does not have to balance a rider on its back and is able to concentrate fully on its task. Once the horse is comfortable with cavaletti work on the lunge the horse can be schooled using cavalletti with a rider.
Why cavaletti work?
Offering your horse this kind of work can be a very effective way to help your horse to build muscles and to find balance. Cavaletti work has several advantages when training a horse. For example cavaletti exercises help to activate your horse’s hind leg by challenging him to pull his hind leg upward-forward in order to step over the cavaletti. Furthermore it helps him to relax his neck and back by arching the back upwards and bending his neck seeking the bit in a forward-downward manner (Illustration 1).
This arching of the back upwards is produced by the movement of the hindleg in the upward-forward manner. In order to balance and see the poles on the ground the horse has now to bend his neck forward-downward thus seeking the bit. You can easily simulate this movement yourself: get down on your hands and knees and form a hollow back while pulling your neck upward looking at the ceiling. Now try to pull your knee toward your chest in an upward-forward manner. You can see that it is extremely uncomfortable and it is impossible to do the movement this way repeatedly. Now repeat the movement while arching up your back and lowering your neck looking at the ground. See how easy the movement is this way? In order to work with you the way you want him to your horse will notice very fast that this is the correct movement over the cavaletti.
These three ingredients: The active hind leg, correctly using the back and neck muscles, and the horse seeking true contact will help the rider to achieve true collection in the advanced training (Illustration 2).
But even if your goal is not that sophisticated, cavaletti work will benefit your horse by helping him to carry the rider because he is in better balance and builds muscle the correct way. The other wonderful thing about working with cavaletti is that it is a lot of fun!
What does cavaletti work do for horse?
Cavaletti work helps your horse to
- get into balance
- build up muscle
- kickstart its hindleg
All this enables your horse to really work with you the way it wants to. By this I mean, your horse gives you all of its concentration: mental and physical power added with the touch of effortlessness in its movements because of his increasing strength.
Security advices
- Start your cavaletti work with a thorough warm up. Both horse and rider should be working for about 20 min before starting cavaletti work.
- Be sure to protect your horse’s legs with bandages, sport boots, and bell boots.
- Shorten your stirrups two or three holes.
- Stabilise the poles you are using. The poles should never lie on the ground without some sort of block securing them. If your horse steps accidentally on them he can hurt its fetlock badly. You can use the fabricated cavaletti blocks or even a short plank mounted under the poles will prevent that they roll.
- Do not use cavaletti of the type with a little cross while lungeing. The lunge can get caught in the cross and tear the cavaletti behind the horse thus causing your horse a lot of stress.
- Be sure to have the correct distances for your horse’s stride. When working in a group be sure to have a helper on the ground who adjusts the cavaletti for each horse.
As mentioned in the introduction, you can enhance your horse’s movement in walk, trot and canter. Working with cavaletti on the straight line in walk will do a lot for your horse’s rhythm. It helps to strengthen the clear four-beat-rhythm of the walk and help the horse to let the walk “flow” through its body. I specially recommend it for nervous horses that tend to lose their rhythm in the walk and tense their back up. Even so, this is the right beginning for every horse when starting to work with cavaletti. Today we will do a bit of medium walk over cavaletti. If your horse has never worked with cavalettis start with one or two poles adding a third and fourth if your horse is comfortable. Remember: you and your horse should have fun while working together. Do not try to put too much into today’s work. Tackle the cavalleti work again in two or three days and you will see how much your horse has learned in a short period of time.
The poles are put into a row with a distance of 80 cm up to 100 cm in between. This depends on the stride of you horse and on the question whether you want to make the stride longer or shorter or just strengthen the rhythm. Start with long reins and let your horse look at the cavaletti . Then ride over the cavalleti every second round. Ride your horse straight before, over,and after the cavaletti keeping a steady contact with both reins. Try to preserve the rhythm you have felt while riding over the cavalettis. It helps many riders to count the rhythm over the cavaletti and to keep counting after them. You can add work in trot or canter on your rounds you are not riding over the cavaletti. Then half halt your horse back to the walk, stabilise the rhythm, and let your horse walk over the cavaletti, remembering to keep the rhythm of the walk. Then trot or canter again but come back to the cavaletti in walk. It will be amazing to see what happens with your horse after a few rounds of this exercise. Your horse will start to relax and seek the bit.
Does your horse feel good and does he offer to do more than this exercise? In this case, we can start to work in trot. Remember: always start with one or two poles at a time. Just because your horse does the cavaletti work in the walk, does not mean that he can muster up the balance and concentration to do four cavaletti in trot from the beginning. The distance for the placement of the cavalletti in the trot is 1.20 to 1.40 m (Illustration 3), depending on your horse’s stride and your goals. If we want to strengthen the rhythm a distance of 1.20 m will be ok. The procedure is the same as in walk: you trot every second round over the cavaletti, ride straight before and after the cavaletti and try to preserve the rhythm. You can add canter or walk work on your “cavaletti-free” rounds, then half halt to trot and trot over the cavaletti again. Integrate your cavaletti work into your dressage work, offering your horse every now and then one round over the cavaletti and then returning to your work you were doing before. If you think that you horse still has the strength to do the cavalletti in canter, put the poles in a distance of 3 to 3.5 m. Start with one cavaletti and find a rhythm in the canter before cantering over the cavaletti. Do not change this rhythm when starting your work over the cavaletti. After a while, you can add more cavalettis and thus work on a steady rhythm.
General recommendation
Work on both leads. Do not bore your horse with working too long over the same distances. Remember that cavaletti work is strenuous for your horse. The cavaletti work shouldn’t exceed 30 min. Finish your training when your horse does the best. Do not forget to let your horse relax after this work by walking with him for a while and to tell him that he did great. Enjoy riding!
© Adriane Setton, Kelkheim, Germany
Author’s Bio
Adriane, German Trainer Level A, started riding at the age of 4. Over the last 30 years, she has been involved with the training of the horse and rider. Starting as a three-day-eventer, dressage became her passion at age 15. She has successfully trained horses and riders in Germany and Mexico.
Adriane was awarded the High Silver Medal in 1996 by the Deutsche Federation Equestre Nationale (FN). In 2005, she received the highest trainer level licence available through the FN, the German Trainer A licence. The final exam included a practical riding test in jumping, dressage and cross-country. The test also included giving training lessons in each of these disciplines in front of a commission and theoretical testing covering riding theory, as well as veterinary and a conformation evaluation. Willi the Champ – who takes the credit for 50% of this Team’s licensing success, was trained by Adriane up to level M in dressage, and L level in jumping and cross country.
While being a competitive rider, Adriane loves to further educate riders and inspire their competitive goals, as well as re-educating riders with the basics. Adriane considers her love for the horses and her dedication and enthusiasm for the sport a reason for her past successes.
In this monthly series, we will go through horse training topics and Adriane will give you the opportunity to offer your horse new ways to classically develop your horse.
Remember: the moment you stop trying to ride better is the moment you stop riding well.
ShareSold to Idaho! Pippi
Name: Sold to Idaho! Pippi
Age: 4 coming 5 years old
Breed: Oldenburg
Size: 16.1 Schooling:Training/ First Level
Location: Colorado
Price:Asking 35K
Description: This horse is one of my favorite horses. She is the easiest horse I have ever ridden. She is super safe, has three very nice gaits and is the easiest horse to ride. She is very nice in the bridle and very smart. She will take you to the FEI levels. This horse comes with my highest recommendation. Breeding: NEW VIDEO! Under New Video player Located at https://www.maneimports.com/video/index.asp


